Disclaimer
Software
Step 1: Ripping
Step 2: DVD2AVI
Step 3: Audio encoding
Step 4: Bitrate calc.
Step 5: Frameserving
Step 6: Video encoding
Step 7: Multiplexing
Step 8: Mastering
Step 9: Burning
FAQ
Glossary
Links
Copyright © 2001-2003
by Jacob Laursen
![]()
Step 6 - Video encoding
Introduction
Important: CCE requires at least an Athlon or Pentium 3 processor! Use version 2.50 - the newer versions simply don't work.
How to
Start CCE, right-click in the listview and choose "Add". In the file requester select "Files of type: All files" - and open the .avs file you just created. If CCE crashes at this point, something is wrong with your script. It could be one of the following mistakes:
- One or more of the paths are wrong. Make sure you have all the files you've written in the script. AVIsynth and mpeg2dec.dll must be installed, as well as vobsub.dll (if you're also doing subtitles).
- In case you moved or renamed your .vob files, edit the .d2v file with a text editor and make sure the paths are correct.
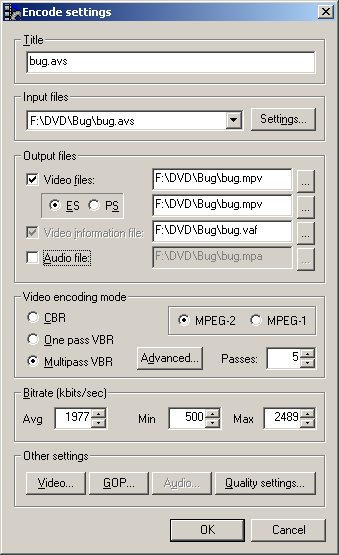
First rule: Don't touch the settings you don't understand. Disable the "Audio file" and select "Multipass VBR". The more passes, the better quality. Choose either 3, 4 or 5 passes - there's no point in doing more than 5. Enter the average and maximum bitrates you calculated earlier. I don't recommend going lower than 500 for the minimum bitrate.
In the "Video" menu select the correct aspect ratio (DAR). 16:9 is only for anamorphic movies! In the "Quality settings..." menu disable "Anti noise Filter".
So far so good. We are now ready to encode - hit "Okay" to close the settings window, and click "Encode" in the main window to start the encoding. The first window that pops up shows the progress of generating a .vaf file - how long this takes depends on the number of passes. When done, another window pops up, and the encoding starts for real.
Last update: Monday, 25-Feb-2002 19:52:17 CET