Disclaimer
Software
Step 1: Ripping
Step 2: DVD2AVI
Step 3: Audio encoding
Step 4: Bitrate calc.
Step 5: Frameserving
Step 6: Video encoding
Step 7: Multiplexing
Step 8: Mastering
Step 9: Burning
FAQ
Glossary
Links
Copyright © 2001-2003
by Jacob Laursen
![]()
Step 2 - DVD2AVI
Introduction
[To be written...]
How to
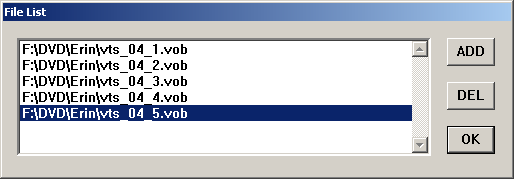 In the menu select File/Open and choose the first VOB file that
SmartRipper saved. DVD2AVI will automatically add the others, as long
as the naming is consistent.
In the menu select File/Open and choose the first VOB file that
SmartRipper saved. DVD2AVI will automatically add the others, as long
as the naming is consistent.
 NTSC:
Select Option/Preview in the menu, and let it run for a while.
If the "Video Type" stabilizes at "FILM" 95% or higher, we are lucky.
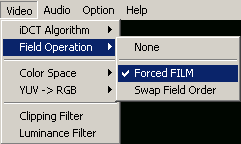
In this case select Video/Field Operation/Forced FILM in the
menu. Otherwise (i.e. "FILM" < 95% or "NTSC") make sure "None" is
selected.
NTSC:
Select Option/Preview in the menu, and let it run for a while.
If the "Video Type" stabilizes at "FILM" 95% or higher, we are lucky.
In this case select Video/Field Operation/Forced FILM in the
menu. Otherwise (i.e. "FILM" < 95% or "NTSC") make sure "None" is
selected.
PAL:
Select Video/Field Operation/None in the menu.
Please note: DVD2AVI remembers the settings when you quit it! Write down (or
remember) the aspect radio, frame rate, video type and frame type.
In the Video menu select YUV -> RGB/TV Scale to get the colors right.
Ripping the audio: We'll also let DVD2AVI handle the audio. You can do this now, or get back to it later (in that case, jump to Saving the project). In the Audio menu select the Track Number that you want on the SVCD. Unfortunately DVD2AVI doesn't read their descriptions, so you will only see track 1-8, no matter how many tracks there are. You might want to have a look in the _INFO.txt file from SmartRipper under "Stream info" in order to choose the right one. Count from the first audio stream.
Now select Audio/Channel Format/Auto Select, Audio/Dolby Digital/Decode, Audio/MPEG Audio/Demux and Audio/48 -> 44.1KHz/UltraHigh (or High). If the selected track is "DD 3/2" (you can see this when previewing), enable Audio/Dolby Digital/Dolby Surround Downmix. If "DD 2/0", make sure it's disabled. Before we start, let DVD2AVI run through the file once by selecting Audio/Dolby Digital/Pre-Scale Decision - this will take a few minutes.
Saving the project: We are now ready to let DVD2AVI process our VOB files. Simply select File/Save Project. If you have chosen to do the audio now, this will probably take some hours - if Audio/Track Number/None is selected, it's only a matter of minutes. It will have to be done at some point, though.
That's it! You should now have a .d2v file, and a .wav file if you did the audio. If you want to rip more than one audio track, just repeat the audio procedure and save the project again. Yes, you can have multiple audio tracks on the SVCD! Two to be exact. ;-)
Notes
- The .d2v file created by DVD2AVI contains absolute paths, so don't move/rename your files once done.
Last update: Wednesday, 28-Nov-2001 16:24:20 CET